Just found the crafting area in the Children’s Museum. So cool. 🙂
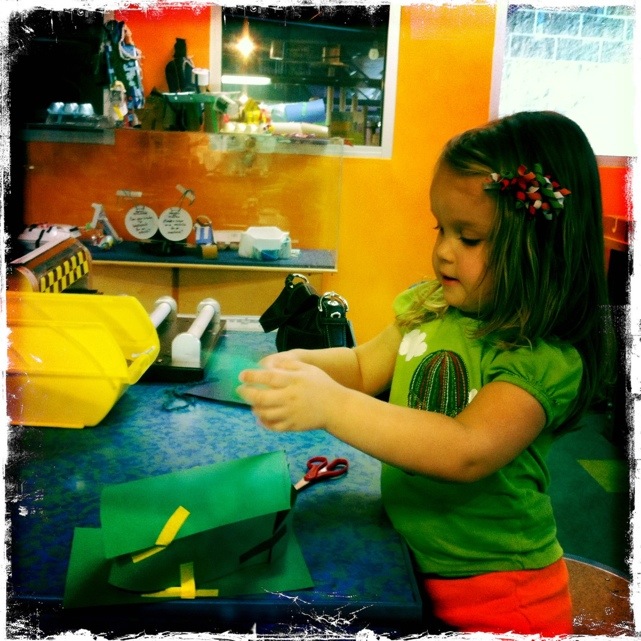
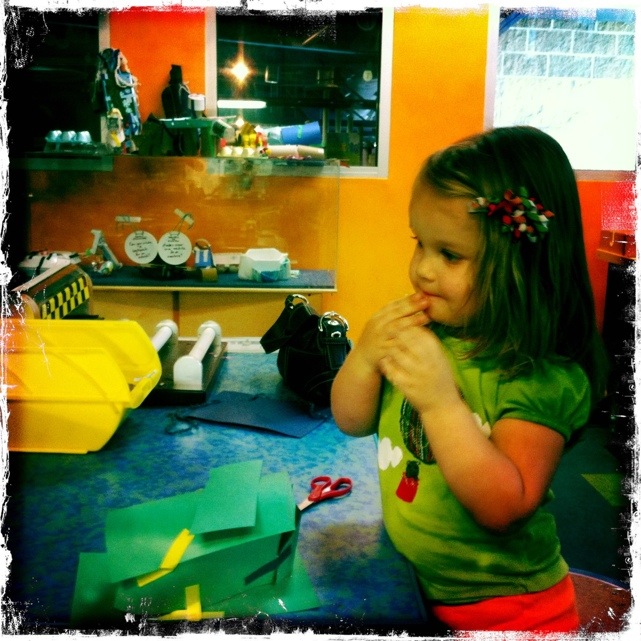

Crafting and kids.
Just found the crafting area in the Children’s Museum. So cool. 🙂
So my sister-in-law had her twin babies this week! Very exciting. 🙂 We haven’t gotten to see them yet as they’re in the NICU getting a big bigger, but we have high hopes that they’ll be able to come home soon. ::fingers crossed::
Kate and I decided to make some lactation cookies this weekend and drop them off. Now I’m not going to claim that these are the tastiest cookies in the world, but they are edible. I never made them while I was nursing Kate, but whenever I ate oatmeal I would be drowning in milk so maybe there’s something to them. 🙂
I asked Michael to print the recipe off for me, but he scoffed at my poor formatting and redid my pitiful pages document. (side note: pages is like word but awesome.)  Here’s the link to the recipe in case you want to make some cookies of your own. Some of the ingredients are a bit out there (brewer’s yeast?) but I was able to find everything I needed at Sprouts.
I’m working on Project Life today. Sill loving it. 🙂
I use almost exclusively hipstamatic pics from my phone like this one. I live the square size! I also love capturing everyday moments. I take a lot of pictures with our DSLR, but I always have my phone with me. Michael takes a lot of phone pictures too and I think it’s nice to add in his perspective since the big scrapbooks are mostly from my perspective.
It’s been too pretty to stay inside, so we set up the water table today. Kate even got a bit of ice cream after dinner. With sprinkles, of course. 🙂

My friend Kate sent us these awesome tongs for our Kate. (Thanks!) I gave her a muffin tin, the bowl of pony beads and the tongs and she went to town.
")
She insisted on only sorting the pink beads. 🙂
")
I love this activity. Using the tongs helps develop her fine motor skills and sorting is always good for the ol’ brain. We’ll be doing this again soon I think.
We got Kate a few pony beads and some pipe cleaners this week.
")
")
It was a hit! She had a blast threading the beads on the pipe cleaners. She’s been threading wooden beads on shoelaces for a long time now, but it was nice to change it up with the pipe cleaners. The stiffness of the pipe cleaners made it really easy for her to work with.
")
The fact that they were sparkly didn’t hurt. 🙂
")
")
We worked with her on making patterns for a bit, but as you can see she lost interest towards the end. 🙂
Michael and I went to a figure drawing class on Sunday night and it was awesome! Instead of having a nude model, they had a burlesque dancer and instead of being in a stuffy studio, it was in a trendy East Austin bar. ::love:: I felt a bit out of place amongst real artists, but I was content to sit in the back and scrapbook. Due to the nature of the class, I brought almost no supplies. Literally, photos, a 6×6 paper pack, paper trimmer, tape runner, ink pad, pen, cardstock and a few rolls of washi tape. I’m not going to lie, it was a challenge to create pages with so few supplies, but I had a great time doing it. Hopefully we’ll go again next month!
")
I had to cut out my own title, what with no thickers, stickers, or cricut, but it ended up just fine.
")
I was a bit worried about having only 6×6 patterned paper, but I was able to layer it in such a way that it spanned the whole page. Of course I added some washi tape. 🙂
")
And here’s the full page. A very different style and color scheme for me, but I love it. I think I’ll experiment with limiting my supplies more often. 🙂
Kate requested a “Mommy Day” today, so we hung around the house and did some art projects. She asked to scrapbook, be still my heart!

I dug out some paper scraps, some misprinted photos, stickers, glitter glue, markers, tape and scissors. She was thrilled!


She was particularly fond of the tape. That is, until she got it tangled up in her hair. It’s extreme crafting! We decided to go with a pony tail for the remainder of craft time.

I worked on Project Life while she created so that I wouldn’t a. interfere b. freak out about the mess. She loved having tons of choices. Usually I give her one thing at a time so this was a bit of a treat. I’ll have to do it more often.


Libby and I found these lists of interview questions to ask your child every year on Pinterest and promptly headed over to Archivers for supplies. She decided to ask them every year on her son’s birthday, and I opted to do them every year on the first day of school. (Wait, my baby is about to start school? No! I don’t believe it!) First, let’s look at the supplies.


You’ll need three roles of this awesome glitter ribbon. Actually, you should probably go ahead and buy 4 or 5 roles just to have on hand, but you only need 3 for this project. 🙂


A pack of gitter thickers (this one had exactly enough 1s, but I would check your pack and make sure you don’t need 2) and a bunch of different colors of Prima Flowers (they’re old so no link, but you can find them on ebay- search for prima milk bottle flowers). I’m going with a rainbow theme so I had pink, orange, yellow, green, turquoise, and purple.


I got some bling to put in the centers of the flowers. You’ll want to get this tool too. It makes it easy to separate the bling and place it in the flowers.


A tape runner, an album and some cardstock and you’re all set. Funny story about the cardstock. I like a specific texture on my cardstock, orange peel. They had all of the colors I wanted except for the purple so I bought it with a smooth texture. As I started working with it though, I realized that it would drive me batty. So today I paid 5 dollars in shipping for a dollar worth of cardstock. Totally worth it.

I came up with 10 questions. It was quite the challenge to come up with questions that would be relevant for both a 3 year old and an 18 year old, but I think I came up with some good ones. Michael helped me to format formatted them like I wanted. I want to ask Kate the same questions on the first and last days of school, so he made 3 columns: one for the question and one for each answer. I also wanted to have her write her name on the first and last days of school. After I printed all of them, I trimmed each page down to 8 inches by 8 inches, though I wish that I had measured the page protectors first. These particular page protectors are a wee bit bigger. Oh well.


Cut 2 pieces of ribbon to 8 inches and put some tape on the back.

Then just stick them down. 🙂 Stick 3 Prima Flowers down in the lower right hand corner. I’m going in rainbow order, and I used the previous color for the flowers (pink flowers on orange cardstock, orange flowers on yellow cardstock, etc.)


Then use the tool to put the bling in the middle of each flower and add the number for the grade. Kate will do 2 years of Montessori preschool, so I did “M1”, “M2”, “K”, “1”, “2”, etc. all the way up to “12”.

Right after I finished this page, I realized that I would have used orange flowers on the yellow instead of green. ::sigh::

And here’s the full page. These will go on the right side and I’ll put an 8×8 picture of Kate on the left. My plan currently is to take a picture in front of our house on the first day of school with her wearing her backpack. We’ll see how long she lets me get away with that. 🙂
Check out this update for photos of the book in use!
I feel like I should have something awesome to put up on the blog today after phoning it in on Friday, but I have to be honest, I got nothing. To be fair, we were out of town this weekend and Kate’s been sick since we got back. I know what you’re thinking, enough with the excuses! Hmm… ::frantically searches through apature library in search of something to be blogged:: Well, I have something of a teaser. 🙂

Here’s a little something that I’ve been working on.

With lots of delicious Prima flowers.

And glittery goodness. I love me some glitter. 🙂