Mummy Hot Dogs

I decided to continue with the mummy theme after finding this Pinterest gem.  I’ll be honest, cocktail sausages gross me out so I used organic hot dogs that I cut in half.  (If I’m being really honest, hot dogs gross me out too, but some sacrifices are necessary in the quest for cute party food.  🙂  )

I rolled out some crescent roll dough and cut it into strips.  Then I wrapped the strips around the hot dogs leaving a little gap for the face.

And baked them according to the directions on the crescent roll package.  Actually, I had to cook them for almost twice as long, but my oven sucks and I never remember to preheat it so I’d go with the package directions if I were you.  lol.

I skipped the mustard eyes because I was running short on time, but I still think they turned out cute.  They were all gobbled up so I’ll assume they were good.  🙂

Guest Post: Resisting No

Raptor Dad here, with a post that is a little more philosophical and a little less how to. Little Raptor loves to paint and be creative which makes me smile. I have a degree in art after all, it was what I dedicated my life to for the first 22 years. Unfortunately, Raptor often wants to be creative at times that seem inconvenient or what’s worse, she wants to paint the wrong way! The wrong way?

I know, I should know better. I went to an art school that frowned on illustration and I railed against the “system” insisting on putting illustrative work in the student show on more than one occasion just for the sake of doing it. That said, I grew up without a lot of money and was certainly poor in art school. That’s built-in a strong respect for the tools. It flusters me when Raptor wants to mix paints the wrong way. Today, I decided I would take a step back, have a cocktail, and let her go nuts.

In the end it was easy to just sit back and let her do her thing. There was less stress for everyone and Raptor learned about mixing paint and cleaning brushes. Not just because I told her about it but because she got a practical lesson by seeing what happened when she didn’t clean the brush between strokes. It’s important to learn by doing and I think that we, as first time parents, sometimes have a hard time letting Raptor do that.


Pumpkin Patch Page

I usually try to scrap at least somewhat chronologically, (and I’m still working on March and April) but I couldn’t resist my new Halloween Paper!  It’s by October Afternoon, my current favorite manufacturer.  🙂

My general MO for 2 page layouts is to cut one piece of patterned paper in half and put it on the far edges.  Then I’ll put 3 photos down each side.  This essentially leaves me with a 12×12 space and it’s much easier for me to figure out how to lay things out in a square.  🙂

I used some Thickers and letter stickers (October Afternoon and Athentique) to make the title and added a bit of washi tape for fun.

I just had to use this date sticker!

I used 3 different journaling spots because I wanted to list all of the fun things that we did.

I inked up the edges of everything to give it some dimension.  Oh, and I used this giant witch sticker.  Love the retro look!

A note on the black chevron paper.  I intended to have it run the length of the photos, but it’s from the 8×8 paper pad so it was too short.  No worries, I cut short pieces and just lined them up so you have the illusion that the paper continues.  Then I added a strip of washi tape so there was a vertical element.  Overall, I’m pretty happy with how this page ended up!


Little Red

It should come as no surprise to those of you who know me that I love tutus.  I was searching for costumes with tutus when I came across this adorable Little Red Riding Hood costume.  Initially, I tried to recreate it exactly huge tutu and all.  I bought 11 yards of tule trying to recreate it and it ended up looking ridiculous.  I suspect that the original is some kind of sewn tutu and I only know how to make tied tutus which end up a lot poofier.  (Note to self: research sewn tutus before next year.)

So I scrapped the tutu and decided to use an existing red dress as the base of her costume.  I made a red cloak and an apron and then put her in her boots.

Michael and I decided that our Little Red could take care of herself so he modded a nerf gun.  He painted some wolves on the gun a la WWII fighter pilots so I decided to add one to her apron.  I think it turned out super cute!

Mummy Milk Boxes

When I saw these mummy juice boxes on Pinterst, I knew that I had to make them.  Thus the idea of a Halloween party was born!  I’m not one to read the directions, so I just noticed that she recommended using electrical tape.  I used white duct tape and it worked great.  I also used milk boxes since we don’t often give Kate juice.

First, remove the straws!

Then cut 2 strips of duct tape and wrap them around the bottom of the milk box one on top of the other.  This makes a base layer that we’ll cover up with thinner strips later.

Then I taped on some Wilton candy eyes that were leftover from Kate’s birthday.

Now for the mummy wrapping.  Take a strip of duct tape, maybe 9 inches long, and cut two short slits in it.  Use them as guides to tear the duct tape into 3 strips.  Tearing it gives it a rougher edge than cutting it, at least on the torn sides.

Then just start wrapping the strips around the milk box taking care not to cover the eyes or the hole for the straw.

Here’s the first one that I did before I wised up and added the base strips and the eyes first.

I cut some smaller strips to go over the top and fill in the gaps.

And here’s the finished product!  I think they turned out super cute.  🙂


Halloween Banner

I bought a yard of this scrumptious halloween fabric a few weeks ago at Joannes with the intention of making a table runner.  It was like $10 a yard (on sale) so I didn’t want to pony up enough money to make a whole table cloth.

Well, I found a table cloth that I loved at Target (bonus, it can be washed!) so I scrapped the table runner idea and waited for inspiration to strike.  I wanted to make some kind of banner anyway (Kate loved the Valentines Day one so much we left it up until April) so I decided to use this fabric to make a penant one.

First I cut the fabric into 10 inch strips with the rotary cutter.  Then I played around with the angle of the flags until I liked the look of it.  I ended up making the cut at 4 inches (so 4 squares.)  Now I could go all high school pre-cal on you and try to figure out the angle… wait, no I can’t.  lol.  Basically, the flag is 8 inches across, 4 inches from each right angle.

Could I be making this any less clear?  lol.  Cut some triangles, mkay?

Then I cut some skull ribbon into strips and laid it all out on some bat ribbon.  First, I tried a zigzag stitch thinking it would help hold the lightweight fabric better, but it looked strange with the bat ribbon so I ripped it out and did a straight stitch.

I so love the way it turned out.  Now, I cut waaaaay too many triangles.  Any thoughts on what else I can do with them?

October Daily Days 5-7

Still plugging along with this project.  I decided to order a bunch more paper in another line (It was October Afternoon!  I couldn’t help myself!) so I’m no longer trying to stretch this paper pack to the limit.  Yay for layering!  🙂

We had a busy day with lots of photos on the 5th, so I added an extra page.

It’s maybe 5×6 so you can see the bottom of day 6 peeking through underneath.  I love that about minibooks.  🙂


Day 6 was another big day- we went to the pumpkin patch!

I wanted to include a lot of pictures, so I resized some in turbocollage before I printed them.

And I added another smaller page.  You can see day 7 peaking out.

I usually do at at least 1 6×6 page for each day and then add in smaller pages as needed, but I went with a smaller main page for day 7.  I wanted to use 2 hipstamatic prints from my phone and I liked the way they looked on the smaller page.

Her name is Hood, Red Riding Hood

Guest post today from Raptor Dad.

This year Kate is going to be Little Red Riding Hood for Halloween, but neither Raptor Mama nor I wanted her playing to stereotypes. She’s getting a beautiful cape courtesy of her Mom, but I wanted to bring something a little different to her costume. Instead of going as the damsel in distress that must be saved by the woodcutter, Kate will be fully empowered to take on any and all hostile woodland creatures…even Mr. Big Bad himself.

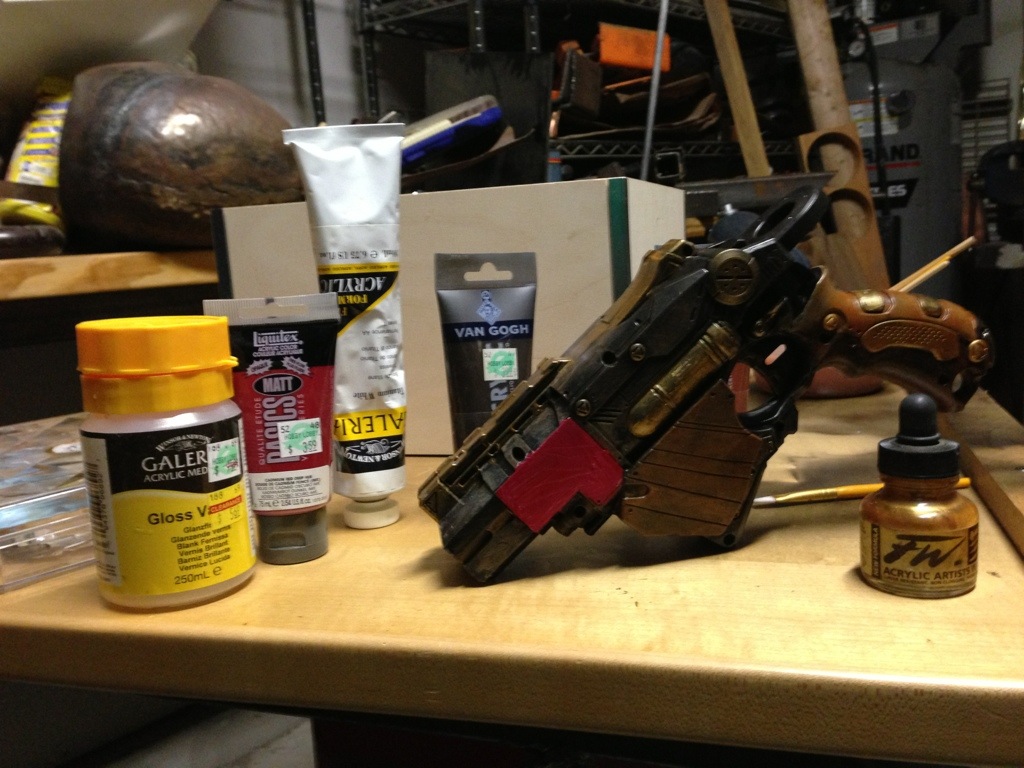
Getting started: we got Kate a basket at Michael’s and defensive armament at Target. The basket is almost perfect, but the gun needs a lot of work.

20121014-214223.jpg

Tools:
File (nail file, jeweler’s file, anything small)
Sandpaper (nothing too rough, 150 grit or higher)
Black spray paint
Acrylic paint based on the color scheme you want to achieve

The first step was removing the Nerf branding with file and sandpaper.

20121014-214653.jpg

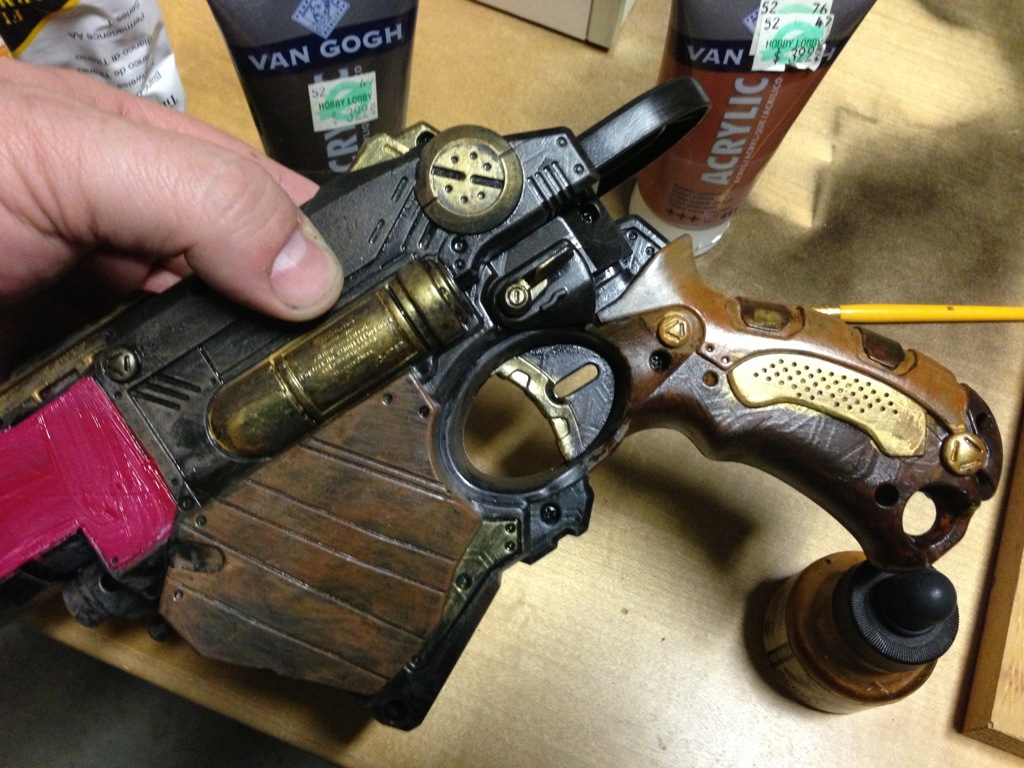
I added a few gouges and took off some bits to make the gun look weathered as well. Next spray paint the entire thing a base coat of black. I forget to snap a pick of this step, but it’s pretty self explanatory. Next using a deep umber and titanium white, I dry brushed the whole surface. This gives the gun a nice weathered look.

20121014-215009.jpg

Next I used gold acrylic ink to add metallic detail to accents. I also used some varnish and sienna paint to make the handle a bit more wood like.

20121014-215200.jpg

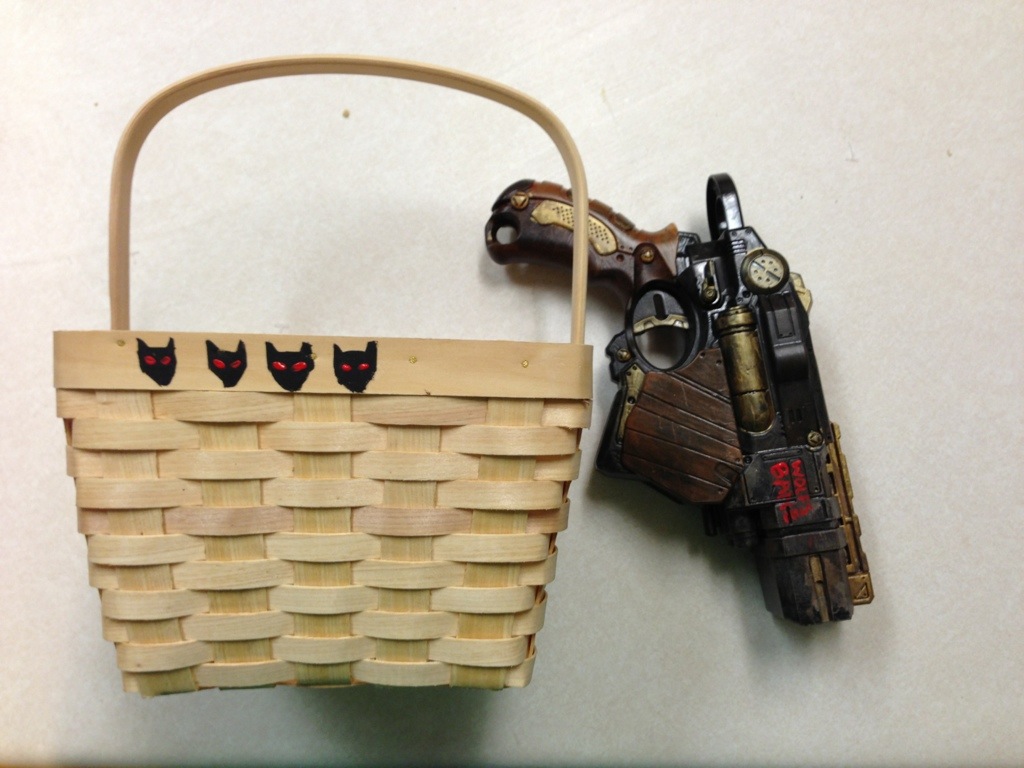
To finish it off, I used red paint to name the gun “Wolfsbane”, and added some black wolf heads, in the same way WWII fighter pilots would mark their kills on the side of their planes.

20121014-215409.jpg

I added a few of the heads to the basket, just to keep the theme going!

20121014-215456.jpg

It was a fun project that only took about three hours start to finish, and it adds a whole other layer of narrative to Kate’s costume. I couldn’t be much more pleased.

Longhorn Napkins

A friend of mine, who is a huge Longhorns fan, wanted some napkins to send to preschool with her twins.  I couldn’t find any longhorn flannel, but I think I came up with something cute that fits the theme.  🙂

They’re essentially the same as the wipes but then I stitched some white rickrack on half of them for added flair.

I’m really happy with how they turned out!

October Daily Days 2-4

I’m having so much fun with this project!

20121009-201900.jpg

Front page of day 2, Kate mailing her invitations.

20121009-202117.jpg

Back page, cooking with Daddy.

20121009-202217.jpg

Front page of day 3, Kate at gymnastics.

20121009-202308.jpg

Back page, eating lunch.

20121009-202453.jpg

Front page of day 4, playing in the backyard. This one’s on a transparency! 🙂

20121009-202645.jpg

And the back page. Loving this!